-
QBustOur Motto is to crack the queue and save your Time
-
QBustOur Motto is to crack the queue and save your Time
The New Way of Smart Queue Digital Queue
QBust is a digital queue management system which is highly recommended if your business has queue’s (e.g. banks, doctors, salons, restaurants). This app is designed to provide an efficient medium to make appointments without wasting time by waiting in long queues. It helps you to automate the appointment/walk-in system. It works together with the QBust customer/provider application. Business provider require QBust provider login and their clients require QBust Client login.
Business Provider can create their profile in this application very easily. Contact number/ Email-id is the primary field which is required to create their profile and will be used by clients to add Business provider to their customers. Business provider needs to enter business name, business address which is mandatory, operational days, open and close time etc. Once profile is created Business provider can view its client appointments. Business provider can add an appointment or walk-in by themselves in the application for the ease.
Behind the scenes


Benefits of QBust
-

The QBust App is a free application that lets you make appointments at health clinics, beauty salons and restaurants the smart way. It’s Free – QBust App is absolutely free and makes use of your internet connection to register appointments. It’s easy to install and has all your listings arranged in an intuitive way to bring you a simple and convenient platform to make appointments.
-

Digital Queuing System – Once registered, users will be part of a digital queuing system that negates the need for actually waiting in lines for hours and wasting their time.
-
Real-Time Updates – The app incorporates state-of-the-art coding protocols to get you real-time updates on the status of your appointments so that you can better manage your time with other important activities that you may need to attend to.
-
Instant Notification and Confirmation – With QBust App, you’ll get instant notification on all your bookings. You’ll also receive reminders by text and notifications to keep you informed about any delays that may occur from the service provider. This lets you plan ahead and make your day even more productive.
-
Token Number Generation - Once the Booking got completed, you will get the digital generated token.
Manual Guide
From here you can select your scenarios to understand how to use this App.

To Book an Appoinment:
If you are the customer and if you need to login to the app to book an appointment, you have to follow the listed procedures given below:
1) Choose the customer login Page on your tab on the above.
2) If you are new user, click the new user option given below, and you have to enter
--> Mobile Number / Email Address -->Enter Your New Password --> Select your country code. then click Signup
3)If you are registered user, just enter --> Mobile Number / Email Address --> Enter Your Password --> Select your country code , then click Login.
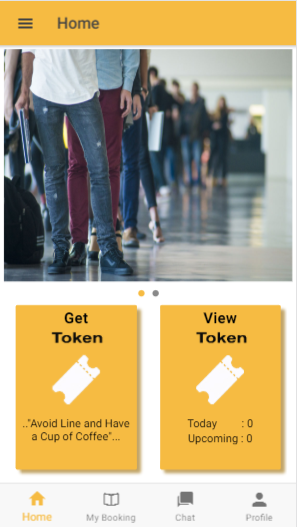
4) After you logged in, you are re-directed to home page which have the options of get token and view token.
5) From there , you have to choose the get token option , After clicked the get token ,a small popup will show in the screen will ask you whether you going to book token for yourself or for others..
6)If you choose for yourself, then it redirected to industry selection page, from there you have to select the industry.
Then you need to enter your appointments details in book appointments screen, you have to choose state, city, Name, date, speciality, specialist, and then you choose the book appointment button below in the screen.
7) Then your token number will generated and you will get your token number in the app itself. This is the procedure to book an appointment.
To Book an Appoinment ScreenShots
 Registration
Customer
Registration
Customer
- QBust
- Customer, Registration
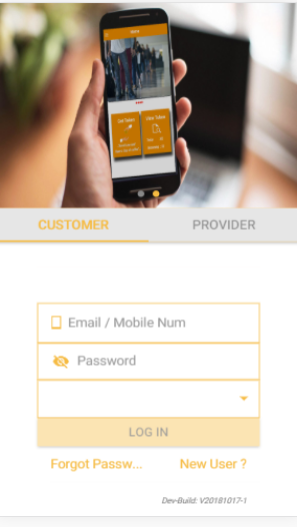
Page Description
Before booking an appointment customer has to register using his mobile number/Email_Id ,password and country.This is a one time registration. The customer can use this credentials further to book his appointments.
-
Developement Tools
-
Developed By
Reksys Solution

 Select Person Page
Customer
Select Person Page
Customer
- QBust
- Select Person Page, Customer
Page Description
On selecting Get Token the customer has the option to book appointment for himself or his benificiaries
-
Developement Tools
-
Developed By
Reksys Solutions
 Select Catogory Page
Customer
Select Catogory Page
Customer
- QBust
- Customer, Select Catogory Type
Page Description
All the category that uses QBust app for booking an appointments are active. The customer is asked to select the category in which he has to book an appointment. The customer can either select the category by selecting the thumbnail view or from the dropdown list
-
Developement Tools
-
Developed By
Reksys Solutions
 Book Appoinment Page
Customer
Book Appoinment Page
Customer
- QBust
- Customer, Book Appoinment
Page Description
Customer is asked to select the necessary details to book an appointment. Incase of hospital , customer is asked to select the speciality and specialist if the hospital provides the facility.
-
Developement Tools
-
Developed By
Reksys Solutions
 Token Generated page
Customer
Token Generated page
Customer
- QBust
- Customer, Token Generated Page
Page Description
After Booking the appointment a token is genereted automatically for the customer.Here,the most awasome facility is the customer can view the current status of the moving token once the appointments start seivced.The customer has the facility of navigation to find the shortest route to reach the provider .The call option is used to communicate to the provider.The customer can reschedule or cancel the appointment using the Reschedule or Cancel option.
-
Developement Tools
-
Developed By
Reksys Solutions

To Cancel An Appoinment:
If you are the customer and if you need to cancel the booked appointment , You need to follow the procedures given below:
1) Choose the customer login on your tab on the above page
2) In that login Page , you have to enter your credentials , After you fill out the details ( Email id/Mobile Number, Password, Country Code ) , then need to press the login button ...
3) After you logged in, you need to click the my booking option on the below tab.
4) Then your active and expired booking are listed on the page, from that you need to choose active booking , In that active booking tab, your active Appointments are listed out , From there you can choose (Click) the appointment you need to cancel.
5) Then another page will travel into your screen with shows you current token and your token number, from there you have the option to delete an appointment.
6) Once you click on delete button, You Appointment will automatically cancel.
Note: No need to delete your expired Appointment.
To Cancel an Appoinment ScreenShots
Registration
Customer
- QBust
- Customer, LogIn Page
Page Description
To cancel an appointment , the customer first has to login using his credentials which he has registered.
-
Developement Tools
-
Developed By
Reksys Solutions
 Token Selection Page
Customer
Token Selection Page
Customer
- QBust
- Customer, Actived Expired Page
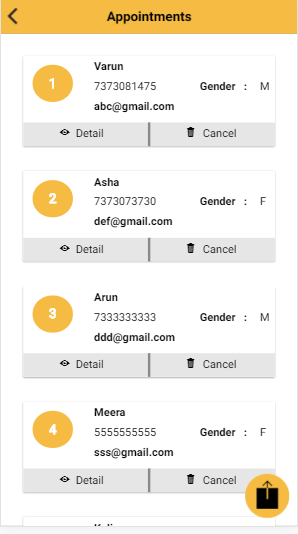
Page Description
By selecting the "My Booking" tab or "View Reservation" the customer can view all his appointments.
-
Developement Tools
-
Developed By
Reksys Solutions
 Token Page
Customer
Token Page
Customer
- QBust
- Customer, Token Page
Project Description
Here, the customer can cancel an appointment by clicking the particular appointment
-
Developement Tools
-
Developed By
Reksys Solutions
 Cancellation PopUp
Customer
Cancellation PopUp
Customer
- QBust
- Customer, Cancellation PopUp
Project Description
In this page, the details of the appointment are displayed.By clicking the cancel option the customer can cancel the particular appointment
-
Developement Tools
-
Developed By
Reksys Solutions

To Reschedule an Appoinment:
If you are the customer and if you need to reschedule the booked appointment , You need to follow the procedures given below:
1) If you are the customer , and if you need to reschedule your appointment , you need to login to the customer login page with your credentials.
2) After you logged in , You need to click the My Booking option on the below tab.
3) Then your active and expired are listed on the page, from that you need to choose active booking, In that active booking tab, your active appointments are listed out, From there you can choose (Click) the appointment you need to reschedule.
4) Then it redirected you to the book appointments page that you need to refill all your appointment details for your new Appointments.
5) Then click on the book appointments button to reschedule your appointments.
To Reschedule an Appoinment ScreenShots
 Registration
Customer
Registration
Customer
- QBust
- Customer, Registration Page
Page Description
The customer can reschedule an appointment for his convenience.To reschedule, the customer has to login using his credentials which he has registered.
Live Preview-
Developement Tools
-
Developement By
Reksys Solutions
 Home Page
Logo
Home Page
Logo
Project Description
Lorem ipsum dolor sit amet, consectetur adipiscing elit. Sed tempus nibh sed elimttis adipiscing. Fusce in hendrerit purus. Suspendisse potenti. Proin quis eros odio, dapibus dictum mauris. Donec nisi libero, adipiscing id pretium eget, consectetur sit amet leo. Nam at eros quis mi egestas fringilla non nec purus.
Live Preview-
Skills
-
Client
Okler Themes
 Appoinment Screen
Brand
Appoinment Screen
Brand
Project Description
Lorem ipsum dolor sit amet, consectetur adipiscing elit. Sed tempus nibh sed elimttis adipiscing. Fusce in hendrerit purus. Suspendisse potenti. Proin quis eros odio, dapibus dictum mauris. Donec nisi libero, adipiscing id pretium eget, consectetur sit amet leo. Nam at eros quis mi egestas fringilla non nec purus.
Live Preview-
Skills
-
Client
Okler Themes
 Select Catogory Page
Logo
Select Catogory Page
Logo
Project Description
Lorem ipsum dolor sit amet, consectetur adipiscing elit. Sed tempus nibh sed elimttis adipiscing. Fusce in hendrerit purus. Suspendisse potenti. Proin quis eros odio, dapibus dictum mauris. Donec nisi libero, adipiscing id pretium eget, consectetur sit amet leo. Nam at eros quis mi egestas fringilla non nec purus.
Live Preview-
Skills
-
Client
Okler Themes
Book Appoinment Page
Brand
Project Description
Lorem ipsum dolor sit amet, consectetur adipiscing elit. Sed tempus nibh sed elimttis adipiscing. Fusce in hendrerit purus. Suspendisse potenti. Proin quis eros odio, dapibus dictum mauris. Donec nisi libero, adipiscing id pretium eget, consectetur sit amet leo. Nam at eros quis mi egestas fringilla non nec purus.
Live Preview-
Skills
-
Client
Okler Themes
Token Generated page
Website
Project Description
Lorem ipsum dolor sit amet, consectetur adipiscing elit. Sed tempus nibh sed elimttis adipiscing. Fusce in hendrerit purus. Suspendisse potenti. Proin quis eros odio, dapibus dictum mauris. Donec nisi libero, adipiscing id pretium eget, consectetur sit amet leo. Nam at eros quis mi egestas fringilla non nec purus.
Live Preview-
Skills
-
Client
Okler Themes